Archive SharePoint Library Documents
A SharePoint tutorial by Peter Kalmstrom
 In order to keep SharePoint libraries easy to overview,
it is necessary to remove files that are no longer in use.
Sometimes you do not want to delete files but want to keep
them for future reference, for example in an archive library.
By using libraries instead of subfolders, you make it easier
to search the documents.
In this Tip Peter Kalmstrom, a Microsoft certified SharePoint
specialist and trainer, shows a workflow that moves SharePoint
library files into an archive library automatically, when
the document status is set to Expired. Peter uses SharePoint
2013 in the demo below, but the workflow for library files
archiving works for SharePoint 2010 too.
Follow these steps to create a workflow:
- On the SharePoint site, create an Archive
library and a Status column.
- Open Site Contents.
-
 Select
add an app and create a new Document Library
. Select
add an app and create a new Document Library
.
- Open the original library. From the Library
tab, go to Create Column to add a new column
for status.

- Select the Type Choice (menu to choose
from) and enter choice values (in this case
New, Ongoing and Expired).
- In SharePoint Designer, create a workflow
-
 From
Lists and Libraries, open the original library. From
Lists and Libraries, open the original library.
- From the List Settings tab, click
List Workflow and create a workflow.
- Open a summary page for the new workflow.
- Under Start Options, check all checkboxes.
- Go to Edit workflow under Customization
and set the Transition to Stage as End of
Workflow.
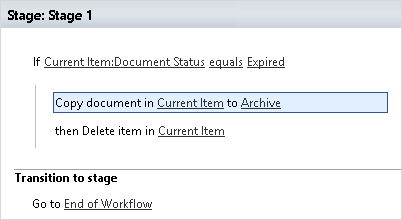
- Press Condition and select If value
equals value. Now you will get the text "If
value equals
value" under
Stage 1.
- Click on the first
value
and set the return field to the newly created
column name. Here it is Document Status.
- At the place of the second
value
you will get a dropdown with the Choices values
that you set while creating the column. Select the
value that you want to use as a trigger for the
move to another library, here Expired.
- Press the Action button and select
Copy Document. Now you will find the text
Copy Document in this
library to this
library at Stage 1.
- Click the first
this library and set it to Current
Item
- Set the second
this library to the Archive
library you have created.

- Press the Action button and select
Delete Item. Now you will find the text then
Delete item in this
list under Stage 1. Click this list and
select Current Item.
- Click on Publish.
Now whenever you set the Document Status column of any file
in the original SharePoint library to Expired, that file
will automatically be copied to the Archive library, and
the file from the original library will be deleted.
|